Quercus Course Care for End of Term
That's right, it's time to think about archiving your existing course and to start preparing your Winter 2020 courses.
We're coming to the end of term - which means, it's time to think about your Quercus courses!
That's right, it's time to think about archiving your existing course and to start preparing your courses for next term. ROSI-generated Quercus Courses have a pre-determined lifecycle which controls when the courses are available and who can access them. Instructors, as well as students, lose access to Quercus courses after a set amount of time has passed.
Things to do at the end of term (AKA right now!): At the end of this term, to avoid future access issues, it's always a good idea to have a back up of both your gradebook and your course content (especially if you're off on Sabbatical next year). You can do both of these tasks by following these instructions:
- Export your gradebook (remember to save it to a vetted and secure location, like your OneDrive)
- Export Course Content and save the course package (also in a secure location). This content package can then be uploaded to an alternate (or new) course, as needed.
- Submit final grades to your Department, using Departmental procedures.
Dates in the near future to be aware of:
- 30 Days Post Session: Those with student, TA, and course designer roles will no longer be able to interact within the course (submitting assignments, uploading files, grading, or any other interactive course element.)
- 365 Day Post Session: Those with Instructor roles will also no longer be able to use the interactive course features.
See the Course Life Cycle support page for full details.
Do you have a course that runs beyond typical ROSI dates?
Make sure that students don't unexpectedly lose access by selecting your end date using the course settings options! It might happen that, as an Instructor, you might want to provide access to a Quercus course beyond the default term settings that Quercus pulls from ROSI. You can do this by setting your own start and end dates for your course.
To enter a new course end date:
- Navigate to "Settings" on the main course menu and select the "Course Details" tab.
- Scroll through your Course Details setting option to the date drop downs for "Starts" and "Ends."
- Select "Students can only participate in the course between these dates."
- Click Update Course Details to save your changes.
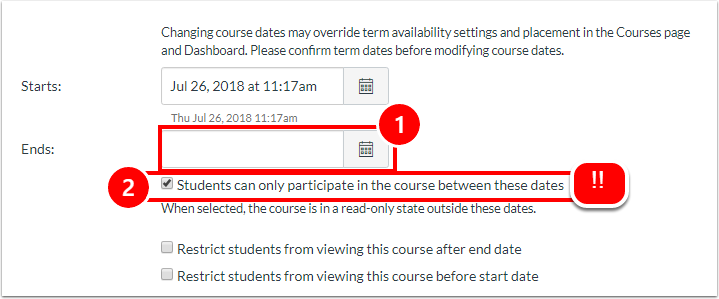
When modifying the default settings, make sure that you select the box "Students can only participate in the course between these dates" or else your changes will not override the defaults term date settings. For full instructions on how to make this change, see "How do I set my own start and end dates on a course?"