There are many things to consider while selecting a method for your content generation.
Here are a few to keep in mind:
- How much time do you have to devote to creation? The timeline for your project will have a large factor in determining what technique you'll implement. It is critical to evaluate how long each video takes to create and produce, how many videos you'll require to encompass your content, and how many hours you have to work on the project before launch.
- How technically inclined are you? Different personalities enjoy the video creation process differently. Some people shine on camera, while some excel on the technical end (and a lucky few can do both!). Play to your strengths and ask yourself honestly whether you have the time and the desire to learn a new software suite, to invest in hardware, to test your video process, and to produce and upload video content - as well as the other pieces that compose your project.
- How many videos will you be producing? As with your timeline, the scope of the content of your project will also be a limiting factor. If you're creating content that equates to a full course, you will likely need to come up with a process that is easy to reproduce (while maintaining quality). If you're creating one or two special topic videos, you might be able to spend more time and budget on higher production values (ex. on site shooting).
- Do you have any budget for assistance? Depending on your Faculty, you'll have different built in options for pedagogical and technical support. The first step would be to investigate options for support that you already have available to you. Secondly, if you have a budget, you can look at hiring support, buying equipment and software, or another option that helps you accomplish your project.
When selecting a method, it is important to consider not only the time it will take for development but also that your method (and your end product) correspond with your pedagogical goals and learning objectives.
You'll likely choose to use a combination of options, depending on the nature of your content. For example, many online courses have had a positive response when each week began with a on-camera brief welcome and overview (under 30s), followed by chapters of content (the equivalent of the content that would have been covered in lecture that week), and supplemented with at home webcam videos to answer any questions that popped up during the week. This provided a nice blend of personality with professional and easily re-usable content.
Commonly Used Methods of Video Production (V2 - March 23, 2016)
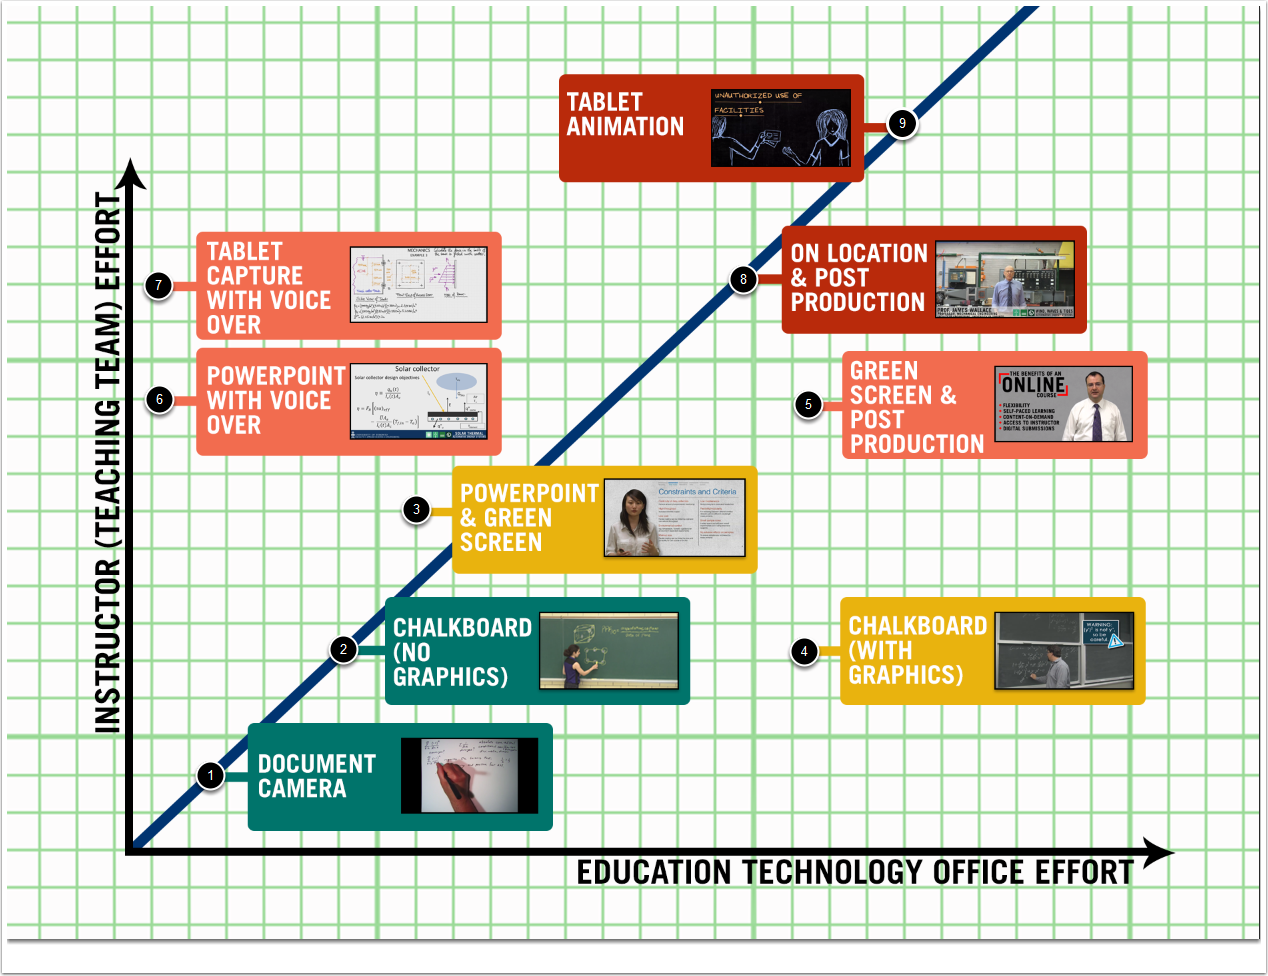
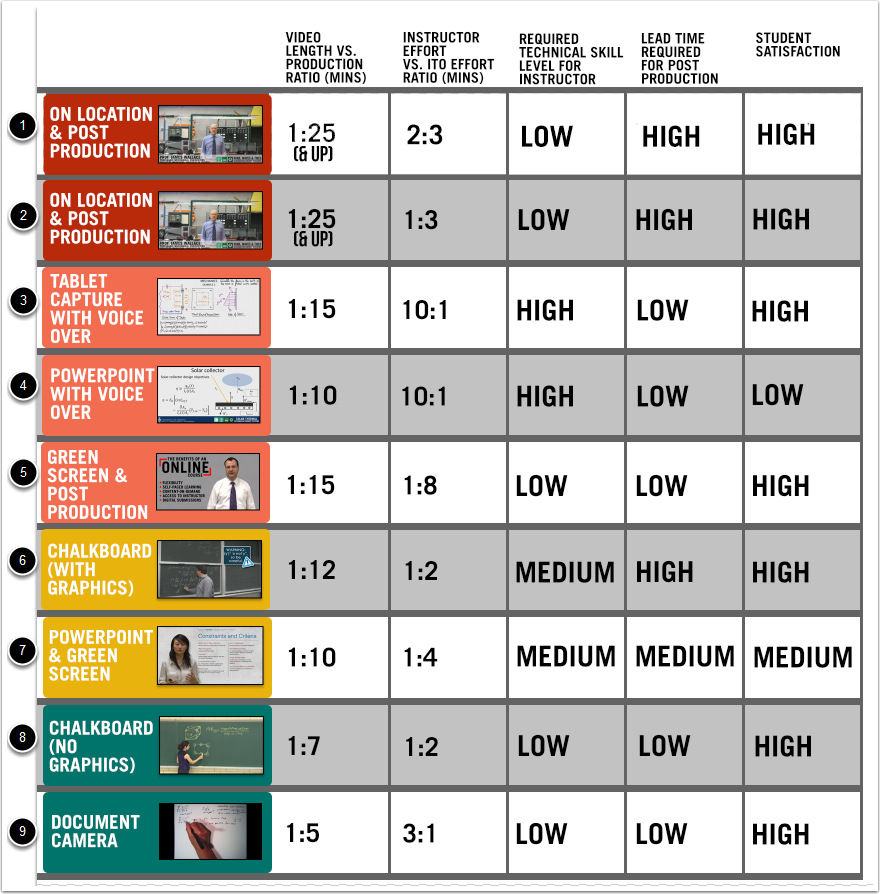
This matrix depicts the effort involved by the Instructor and Education Technology Office Support Staff. The idea is to balance the amount of effort available to produce these videos, which is limited by budget, timelines, and human resources (and other things).
- Document Camera (Example Video) - This format uses a set up much like an overhead camera to film from above. It is also effective for small demonstrations.
- Chalkboard (no graphics) (Example Video) - This format mimics the classroom experience, with the instructor speaking directly to the camera. To the viewer, it feels as though they are being spoken to directly and that the content was created for them (versus lecture capture). This requires a committment for on camera time from the Instructor, but requires little post-production.
- Powerpoint & Green Screen (Example Video) - This format looks incredibly professional but is entirely reliant on the effectiveness of the slides (well designed slides are a must) and the charisma of the instructor. The instructor/presenter is controlling the slides using a remote in this technique. This calls for a large investment of time from the Instructor (or teaching team) as the slides are incorporated into the video as is. They are not done in post-production.
- Chalkboard (with graphics) (Example Video) - This format expands on Option 2 by adding a bit of design flair. Anecdotally, it seems to spark interest and break up the content to help students pay attention. This requires no extra work from the Instructor (versus Option 2, but increase time spent in post production).
- Green Screen & Post Production (Example Video) - This format expands on Option 3 by relying entirely on post production to add in the graphics. This allows for perfect transitions and timing, reduces the pressure on the instructor because they do not have to control the slides, but requires a great deal more time in post-production. However, it tends to look the most professional. This is usually the most effective for shorter videos.
- Powerpoint with Voice Over (Example Video) - This format allows for the independence of the instructor to produce and record content on their time, as needed. Once the process is learned, it can be very effective (again, depending on the slide design) but it relies on the proficiency of the instructor. Since this format is often completed independently, it is one of the only methods that requires the Instructor to master some editing techniques themselves.
- Tablet Capture with Voice Over (Example Video) - This format maximizes one of the students favourite things - seeing the content generated (written, drawn, etc.) in real time. Unlike powerpoint, which can be difficult to pace properly, tablet drawing usually self-paces due to the simple restriction of drawing/writing time.
- On Location (multi-scene) Shooting with Post Production (Example Video) - This format has the most bang, when done well. It is the closest to a "real" movie that we get to. It is usually on location, with multiple cameras and staff, and requires the most amount of post-production and pre-production planning. It also is the hardest to get right. It can be quite easy to accidentally fall into the zone of cheap or cheesy and the students are usually the first to sense that. Filming in an uncontrolled environment is the most difficult process to complete while maintaining a high standard of professionalism. Because there are many mitigating factors, like sound, light, people, equipment, it requires thorough planning to achieve a quality film. This type of filming often requires multiple takes and even multiple days (if shots do not work out as intended). It is difficult to edit these videos, as editing requires re-shooting and it is difficult to reproduce the same environment for a seamless edit.
- Tablet Animation (Example Video) - This format combines a few really great things that we've seen used in the previous options; namely, hand drawn, real time animations with voiceover. It's a visually appealing, dynamic effect with only one's imagination (and artistic ability) limiting the content on the screen. It is, however, the most time intensive for both parties. The instructor contributes by visualizing and describing their content to the production team, who then spends many hours creating artwork to reflect this vision. It is ideal for core content that will see many terms of re-use.
Video Production Matrix
There's more! Combined Video Techniques
In addition to using one of the above techniques, we can also incorporate many different techniques. (Note: Both of the projects below are intended for re-use and are part of the curriculum of several classes.)
- Green Screen Instructor + Graphics (Example Video) - This is a little bit different from the example shown in Option 5 (Green Screen + Post Production) because we toggle back and forth between having the Instructor on screen and then using voice over powerpoint. The benefit of this method, even though it increases post production, is that you get more real estate for content as needed. It helps also to increase interest by moving from scene to scene. They key to the success of this type of video, as usual, is the strength of the graphics. In this case, Alan had a very mature and well designed slide deck that we were able to incorporate into the video. If this is not the case, additional time should be allocated to developing a template for graphic design.
- Instructor Introduction + Voice Over Powerpoint (Example Video) - This technique is an example of combining Option 5 (Green Screen + Post Production) + Option 4 (Voice over Powerpoint). We shot a brief introduction wherein Michelle presents the learning objectives for the video, and then transition to her self-captured powerpoint content. This video is also enhanced with some graphics added in post production.