
This blog summarizes the webinar by Tamara Bahr, Ben Poynton and Shayne Train and on different captioning tools available to use by us.
Session and Blog Details
Tamara Bahr I Manager | Teaching, Learning and Technology, along with Ben Poynton | AODA Officer | University of Toronto, and Shayne Train | Faculty Liaison Assistant at CTSI offered a session on video captioning tools at U of T and focused on how important video captioning is to accessibility for all students (it benefits everyone to be able to search a video for specific terms) and took us through:
- Selecting a video conferencing tool (what you are using to record your video)
- Selecting a video hosting tool (where you are uploading your video content in order to share it with your course or other learners)
While this blog will summarize some key highlights, you might be interesting in watching the entire session (view the Exploring Captioning and Transcription Tools recording from February 3, 2021).
Webinar Agenda
- Why do we need captioning?
- Important Terminology and their distinctions
- Explore tools to add captions to synchronous and asynchronous meetings
- Utilize workarounds for adding captions
- Other Tools
- Overview of the tools
- Additional Resources
Why do we need captioning?
What is the Accessibility for Ontarians with Disabilities Act (AODA)?
- Provincial law that sets out the process for developing and enforcing accessibility standards to reach to goal of an accessible Ontario by 2025
- All websites accessible to the public must meet an international standard of accessibility
Who benefits from captioning?
While accessibility is important, there are so many benefits to captioning.
- Students who are d/Deaf, deafened, hard of hearing or with hearing loss
- Students with cognitive disabilities (ASD & ADHD)
- Students with learning disabilities
- Students who use English as a second language
- Fast dialogue, accented English, mumbling, background noise
- Technical terminology; sound-sensitive environments
What are the legal Captioning Requirements (AODA & the Code)?
- It is legally required that a video has captions when the video on a website is accessible to the public and the video is directly controlled by the University of Toronto. If you're posting your video only to your course, uploading captions isn't mandatory. However, as you saw above, it's helpful to all your learners to do so, so we really encourage captions as much as possible
- Legally required when individual makes an accommodation request - When a student makes a request, refer them to the accessibility services on the campus
A quick overview of the Institutional Tools with Captioning
| BB Collaborate |
|
| MS Stream |
|
| Zoom |
|
| MS Teams |
|
| PowerPoint |
|
If you are not sure what tool to use, here is a guide on Which webinar tool should I use (and when)?
Some Important Terminology and their distinctions
| Captions | Transcripts | Subtitles |
| Captions are text versions of speech and other important audio content synchronized to the visual and auditory content. The most common type of captions is “Closed Captions,” which can be turned on or off via the “CC” button on video players. | Transcripts are text versions of speech and descriptions of important audio and visual information with no time information attached. Transcripts allow anyone who cannot access the web audio or video content to read a text transcript instead. | Subtitles, on the other hand, are text translations of speech and audio content. |
| Soft Captions | Hard Captions |
| Soft captions are used as an overlay, on top of the video. This is usually generated or uploaded separately (Usually in .SRT or .VTT format) after the video production and they do not make up the video itself. This means that some of the tools provide the flexibility to turn on and turn off the captions as the user desires. Soft captions are easy to edit and does not require changing the video. | Hard captions are produced when the video is edited and are permanently ‘burnt’ into your video. This means that the captions cannot be altered once the video has been rendered separately and cannot be turned off. Hard Captions has several advantages including reliability, timing and custom styles. |
Explore tools to add captions to synchronous and asynchronous meetings
An interesting poll was conducted on the session to see what tools are being used by the audience to conduct online classes and the results are shown below:
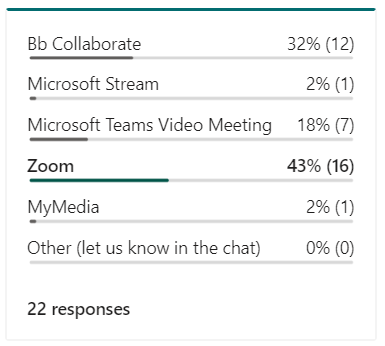
The poll in the webinar showed that about 43% of the audience use zoom which has support for live and automated transcription available. On the other hand, about 32% of the audience use Bb Collaborate which does not have live captionning and requires manual uploading of captions. Although the recommended tool for accessibility is Microsoft Teams, it is not easily available in an academic setting and hence might be the reason for a lower ratio.
Bb Collaborate:
This tool is integrated with Quercus and up to 500 students are supported in a single session. Note that non-public courses may not require captioning unless specific students request it. PowerPoint and other Text editing tools can be used to deliver while sharing screen. Please refer to the guide on How do I add captions to my Bb Collaborate Recordings? for a step-by-setp walkthrough.
Limitations:
- Does not support automatic live captioning. It requires a human captioner to be assigned. Note that UofT does not provide additional resources for human captioning. An alternative is to ask a volunteer, crowdsource captioning of your content or generate the captions post recording
- During the session and captioning, there is no way to distinguish among speakers
- Does not support captioning in Breakout Rooms
- For automatic caption generation, the recorded video should be downloaded and re-uploaded to the other platform (like MS Stream) which can generate captions
MS Stream:
MS Stream is a video hosting platform for asynchronous recordings; it is used in conjunction with a webinar or other capture tool to share recordings (it doesn't make the recordings). It has auto-caption generation feature available which provides us the flexibility to add captions to any of the recorded videos with audio in multiple supported languages. The captions generated by the tool is available to download in the .vtt format. This feature comes in handy when you need to upload captions on other platforms that does not have the auto-caption generation feature available (like MyMedia). The captions generated can be edited on the tool or can be downloaded locally and modified. Make sure not to change any of the timestamps in the caption file.
Limitations:
- Videos require uploading to Stream
- Captions need to be enabled on the video. This option is checked by default, but it is good practice to make sure the sure the "Autogenerate captions" options is turned on.
- Sharing settings in Stream are complicated; you can choose to share the video to the entire UofT community (which makes it available in searches) OR you can manually add, individually, certain people to the video's permissions. This doesn't work so well in courses, where you'd have both a lot of videos and a lot of people to add. If you're ok with your videos being accessible, this is a great solution. If not, you might look to MyMedia.
Zoom:
Zoom has live and automated transcript features available. Live captioning is supported only in the main room and not the breakout rooms.The UofT Zoom account does not include cloud storage which is required to generate transcripts. A captioner (either a human captioner or a 3rd party tool using API links like Otter.ai) can be assigned if one needs captions in the breakout rooms. As already mentioned previously, a human captioner service is not available at U of T and the 3rd-party tools are to be used at user's own discretion. The recordings can be stored locally on the computer or on the zoom-cloud. Since the U of T Zoom account does not have cloud storage included, it is recommended to record and store the videos locally.
Limitations:
- The recording if stored on the zoom cloud, is only available for 120 days. It is a good practice to download and save the recordings locally so that the content is not lost
- There is no support for live or automatic captioning in breakout rooms
- The transcripts are generated only if the video is saved to the Zoom-cloud and the audio transcripts are saved in VTT format.The VTT file is available for download and can be edited locally using any text editor. You can also view or edit transcripts in the web portal.
MS Teams videos:
MS Teams has live-captioning feature available. This can be enabled during meeting under the 3-dot menu and selecting “Turn on live captions”.
Limitations:
- The real-time captions are not retained in the recording after the meeting
Utilize workarounds for adding captions
MyMedia:
MyMedia is an archival storage and streaming platform for the University of Toronto's media content. The tool does not have the feature to auto-generate captions, but supports adding an external caption file in the .VTT format. The caption file can be obtained from other tools like MS Stream.
PowerPoint:
PowerPoint supports caption display while presenting in Synchronous and Asynchronous recordings. This feature is only available in the desktop app and not yet available in the web version. Note that the PowerPoint takes significant time to process and the size is significantly larger when compared to other recording platforms.
Other tools
MS Translator:
This translating tool can be used in conjunction with a webinar to provide live translations in multiple languages. It currently supports up to 100 participants. The tool can be explored at https://translator.microsoft.com/
Overview of the tools
Here is a slide from the webinar summarizing the different features supported by the tools
![]()
Additional Resources
Tip sheets: